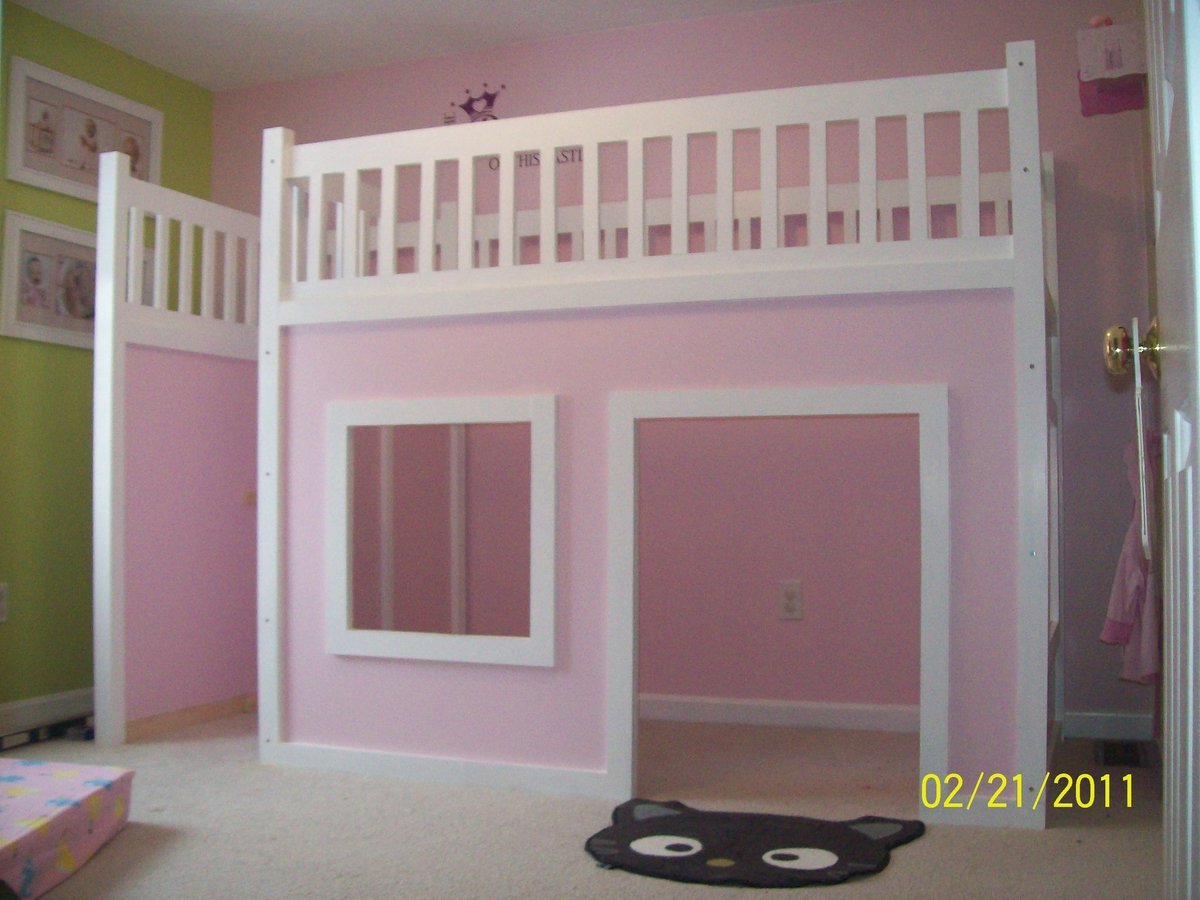
Building a playhouse bed is easier than you think with this straight forward plan. It's a big project, it's going to take patience and persevering, but as so many of our readers have discovered, well worth the hard work!
Special thanks to Kimberly for sharing her amazing photos of Princess Katherine's bed.
Dimensions:
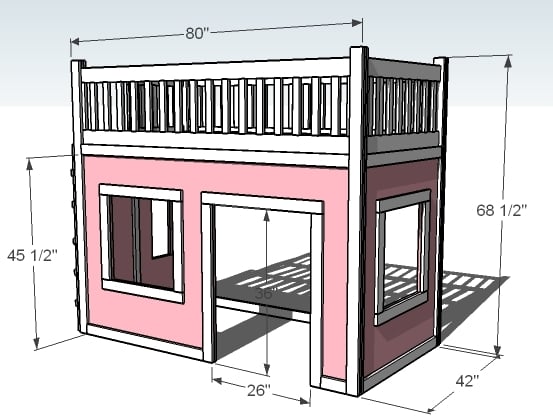
Dimensions:
Dimensions are shown above. This bed does not include the storage stairs (see add on plan)MATERIALS AND TOOLS
Shopping List:
2 sheets of 3/4″ MDF, particle board or plywood (sanded to reduce splinters)
7 – 1x2s, 8′ long
15 – 1x3s, 8′ long (not including 1x3s for mattress slats)
6 – 1x4s, 8′ long
3 – 2×2, 8′ long
1 1/4″ pocket hole screws
2″ Screws
1 1/4″ finish nails
2″ finish nails
wood glue
wood filler
Finishing Supplies
7 – 1x2s, 8′ long
15 – 1x3s, 8′ long (not including 1x3s for mattress slats)
6 – 1x4s, 8′ long
3 – 2×2, 8′ long
1 1/4″ pocket hole screws
2″ Screws
1 1/4″ finish nails
2″ finish nails
wood glue
wood filler
Finishing Supplies
wood glue
wood filler
120 grit sandpaper
primer
wood conditioner
paint
paint brush
Tools:
measuring tape
square
pencil
hammer
safety glasses
hearing protection
drill
circular saw
jigsaw
nailer
sander
level
countersink drill bit
CUT LIST
Cut List:
53 – 1×2 @ 11 1/2″ (Rails)
4 – 1×4 @ 80″ (Top and Bottoms of Rails)
4 – 1×3 @ 11 1/2″ (End of Rails – Front and Back rails)
1 – 3/4″ Plywood or MDF @ 48″ x 80″ (Front Plywood)
8 – 1×3 @ 68 1/2″ (Legs)
1 – 1×3 @ 75″ (Top Front Trim)
2 – 1×3 @ 36″ (Door Trim)
1 – 1×3 @ 31″ (Door Trim)
1 – 1×3 @ 38″ (Front Trim)
1 – 1×3 @ 6″ (Front Trim)
6 – 1×3 @ 21″ (Window Trim)
2 – 1×3 @ 26″ (Window Trim)
4 – 1×3 @ 2″ (Top Leg Filler Pieces)
2 – 1×3 @ 45 1/2″ (Back Leg Filler Pieces)
1 – 1×3 @ 80″ (Back Base Trim)
2 – 1×4 @ 37 1/2″ (Top and Bottom of Side Rail)
2 – 3/4″ Plywood @ 48″ x 37 1/2″ (Side Plywood)
4 – 1×3 @ 37 1/2″ (End Trim)
2 – 1×3 @ 25 1/2″ (Window Trim)
2 – 1×4 @ 21 3/4″ (Ladder End Rail Top and Bottom)
1 – 1×2 @ 66 1/2″ (Ladder Inside Support)
2 – 1×2 @ 43″ (Ladder Spacer)
2 – 2×2 @ 48″ (Ladder Sides)
5 – 1×2 @ 15 3/4″ (Ladder Rungs)
2 – 1×3 @ 13 1/2″ (Ladder Side Window Trim)
2 – 2×2 @ 75″ (Cleats for the mattress support frame)
1x3s @ 39″ (Mattress Slats, as recommended by the mattress company)
STEP 1
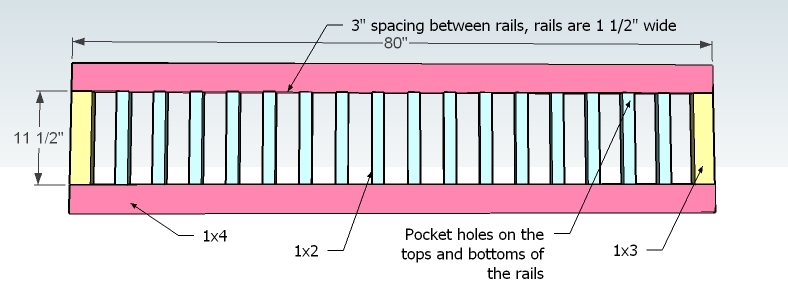
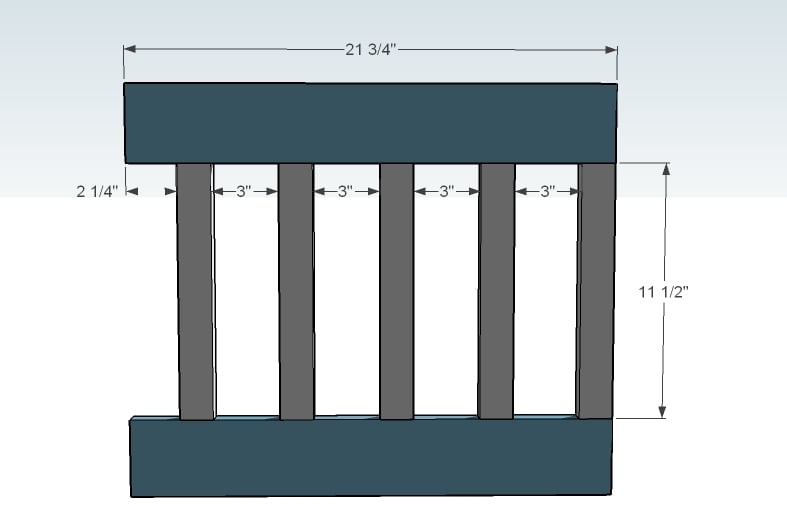
Front and Back Railing
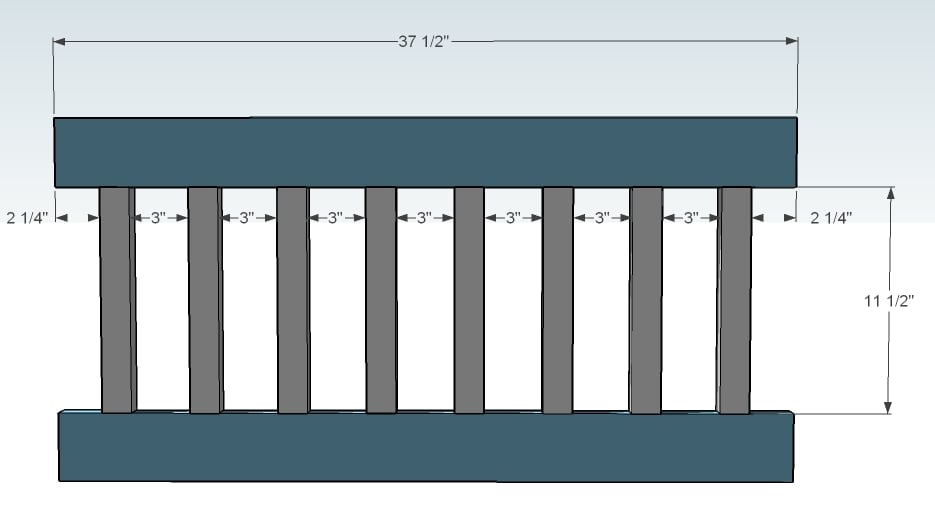
Build two of these – one for the front, and one for the back. Simply drill two pocket holes on both ends of all of the rails (blue) and ends (yellow). Mark the top and bottoms (pink) with 3″ spaces, remembering that a 1×3 is actually 2 1/2″ wide and a 1×2 is actually 1 1/4″ wide. Use glue and 1 1/4″ pocket hole screws to attach the rails to the tops and bottoms, as shown above. Set aside.
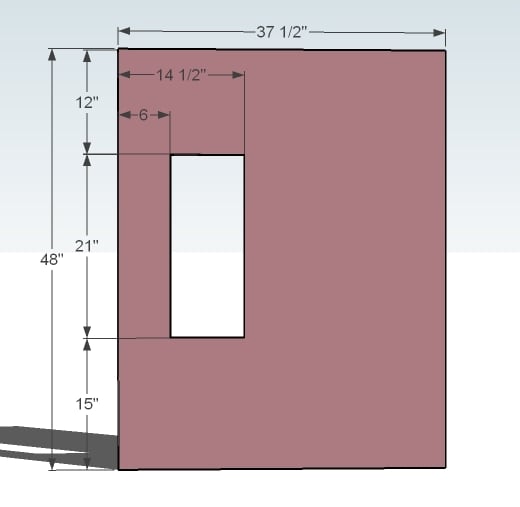
STEP 2
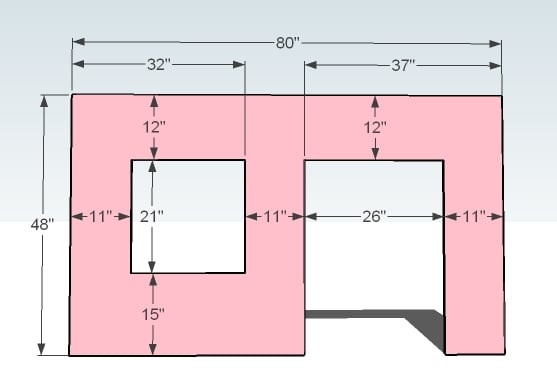
Front Plywood
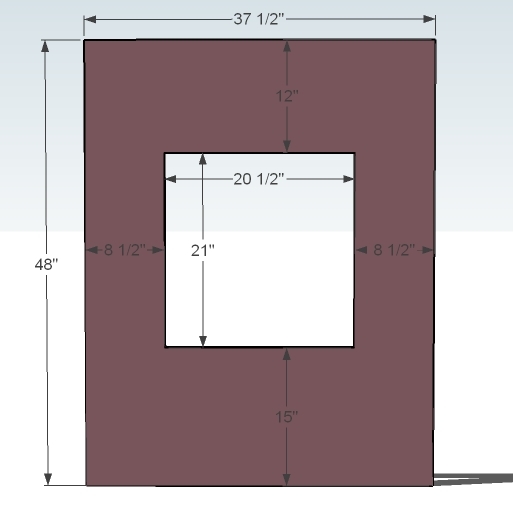
Mark out your front plywood as shown above. Use a jigsaw to carefully cut out the windows and doors.
STEP 3
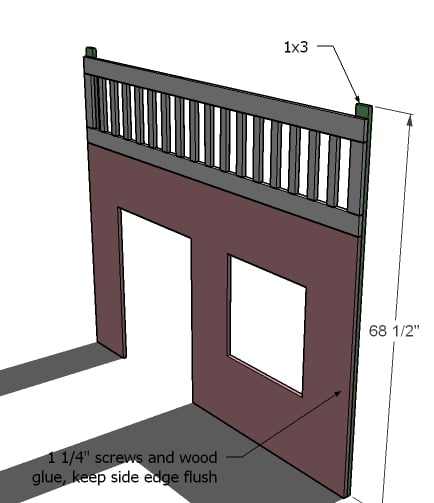
Front Legs
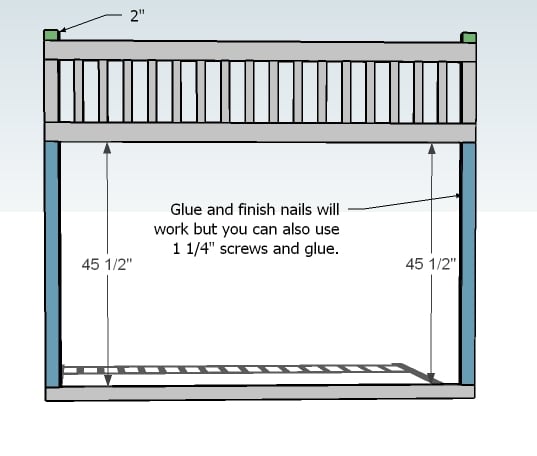
Use 1 1/4″ screws and glue to attach the plywood and the rails to the legs, as shown in the diagram. Keep bottom and outside edge flush.
STEP 4
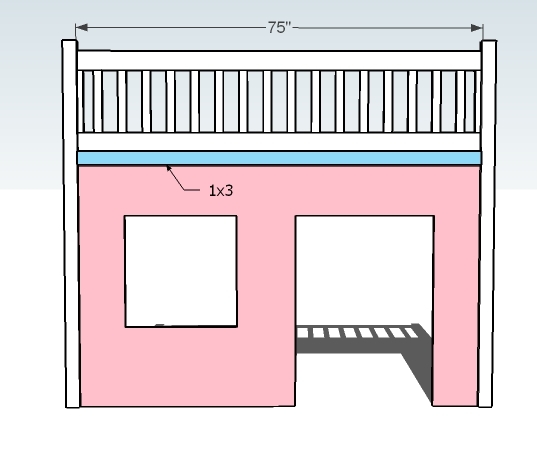
Top Trim
Attach the 1×3 to the front of the bed. Use 1 1/4″ screws and glue,overlapping the rails by 1″, hiding the joint between the railing and the plywood.
STEP 5
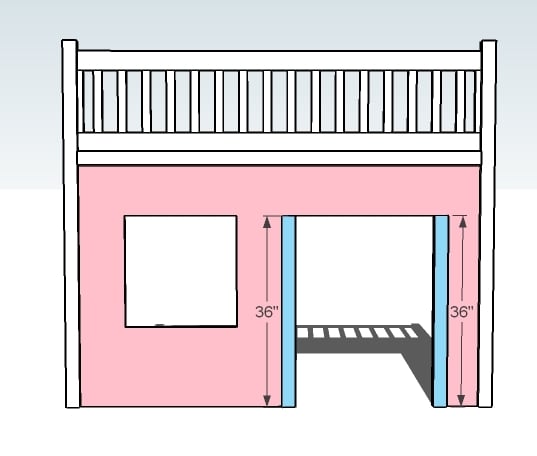
Door Trim
You can get your nailer out now. Or continue to use 1 1/4″ screws. And glue. Keep inside edges of the door as flush as possible.
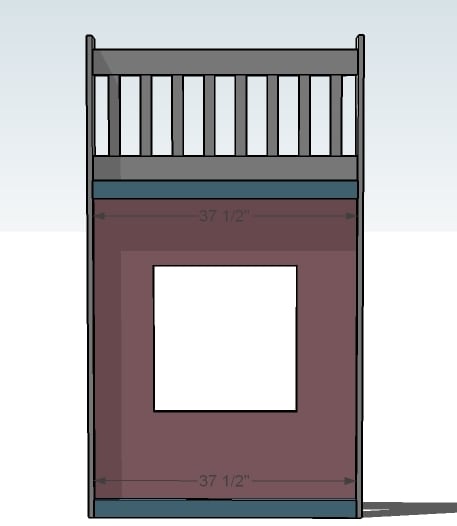
STEP 6
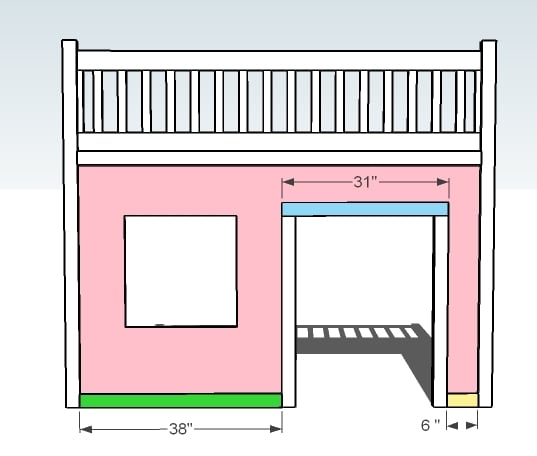
Front Trim
Add the remaining trim, as shown above. Use 1 1/4″ nails and glue.
STEP 7

Window Trim
Add the window trim as shown in the diagram. Use 1 1/4″ finish nails or screws and glue.
STEP 8
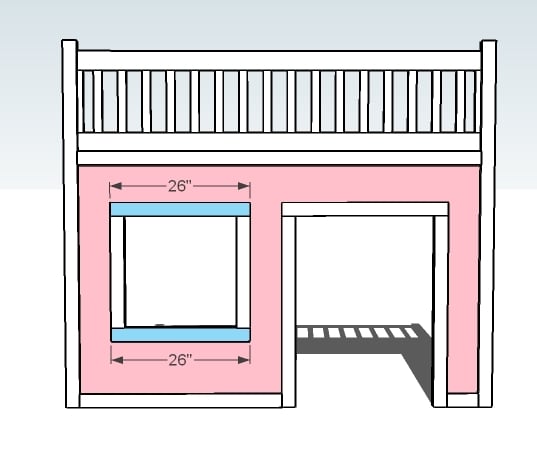
Window Trim
Trim out the window as shown above. You can alternately build your window frame with a Kreg Jig™, and then attach to the plywood front.
STEP 9
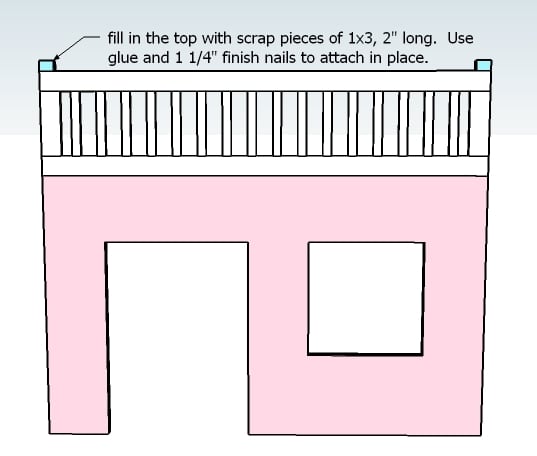
Top Fillers
Add the top pieces to the tops of the legs to fill in the gaps. Avoid overnailing and splitting the wood. Use 1 1/4″ nails and glue.
Click on the page links below for the complete instructions on building the back up next.
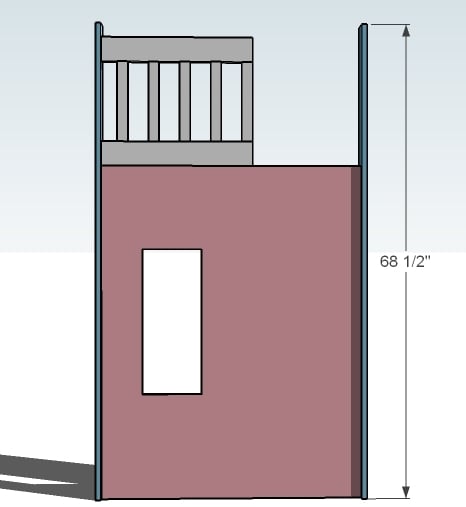
STEP 10
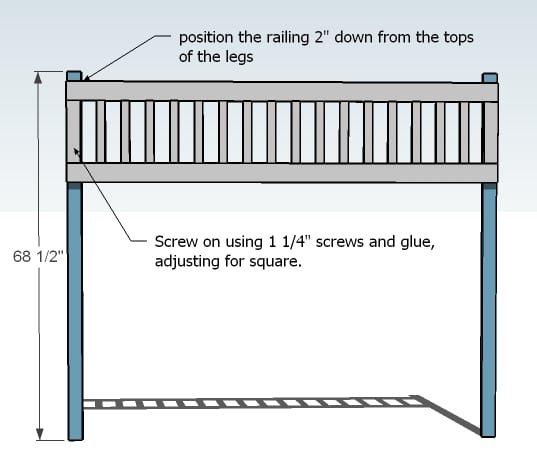
Legs and Railing
Attach two legs to the railing as shown above (on on each side – you should still have four legs left). Use 1 1/4″ screws and glue. Leave 2″ at the top of the legs. Adjust for square.
STEP 11
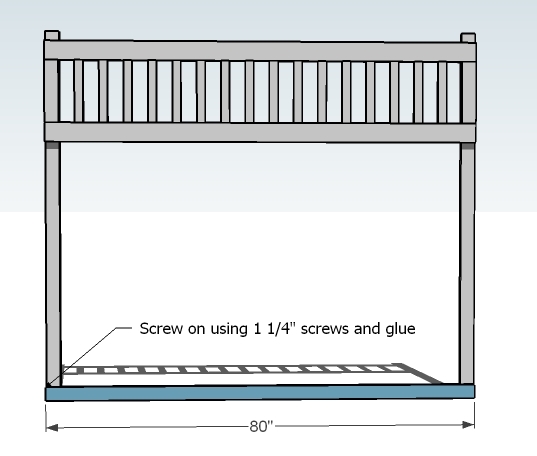
Back Bottom Trim
Attach with 1 1/4″ screws and glue the back bottom piece as shown above.
STEP 12
Back Trim
Fill in the exposed gaps with 1×3 trim boards as shown above. Use 1 1/4″ fasteners and glue.
And now we have two of the wall built! Click on the page links below to see how to build the side walls.
STEP 13
Build the Side Railing
For the side without the ladder, build the railing as shown above with a Kreg Jig™. Drill two holes in each of the rails ends, and use 1 1/4″ pocket holes and glue to attach the rails to the tops and bottoms of the rails
STEP 14
Legs
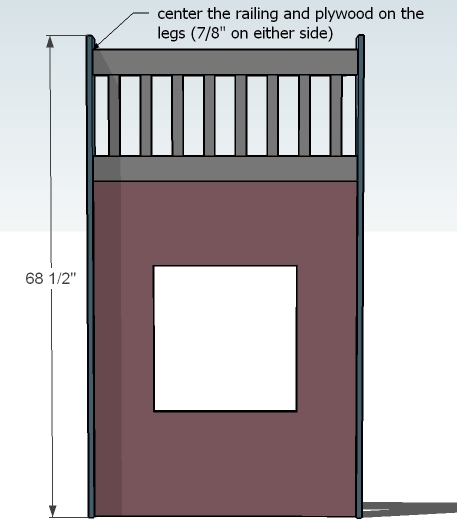
Attach the legs to the sides of the plywood and the railing. Your best bet is to use pocket holes, drilled from the plywood, screwing into the legs (same with the railing). Use 1 1/4″ pocket hole screws and glue. Center the plywood and the railing on the legs.
STEP 15
Trim
Attach the trim to both the legs and the plywood,overlapping and attaching to the railing also (as you did the front,overlapping 1″). Use 1 1/4″ screws and glue, 1 1/4″ pocket holes and glue to attach to the legs.
STEP 16

Window Trim
The best way to go on window frames is to build them separately with 1 1/4″ pocket hole screws, and then tap on with finish nails and glue. You can alternately attach with 1 1/4″ finish nails and glue.
This completes the end wall without the ladder. Click on NEXT PAGE below to see how to build the ladder end.
STEP 17
Ladder End Rail
As you built the other rails, build the ladder end rails as shown above.
STEP 18
Ladder End Plywood
Cut your ladder end plywood as shown above, carefully cutting out the window.
STEP 19
Legs
As you did with the other sides, add the legs to the plywood and railing. Best option is pocket hole screws (1 1/4″ pocket hole screws) or 2″ screws and glue from the outside.
STEP 20
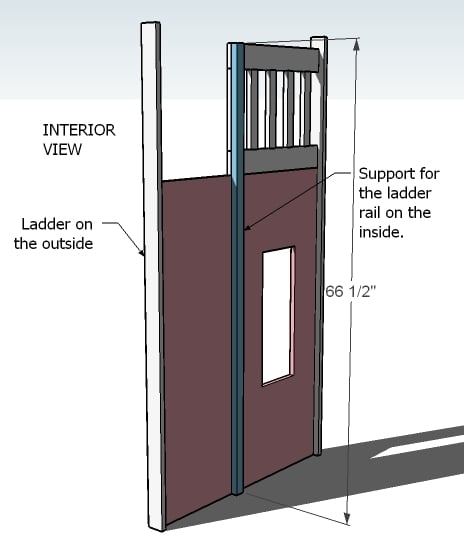
Ladder Railing Support
So I tossed and turned on this one, knowing that little hands are going to be pulling on the top of this railing and knowing it needed to be sturdy. The best bet was to run a support down the entire length of the inside. Use 1 1/4″ screws and glue to attach the 1×2 to the inside as shown above. Notice how it’s flush with the end of the railing?
STEP 21
Step 21 Diagram:

Step 21:
Ladder End Trim
Just like you did the other end, add the trim boards. Use glue and 1 1/4″ screws or nails. Overlap the railing by 1″ to keep the railing in place.
STEP 22
Step 22 Diagram:
Step 22:
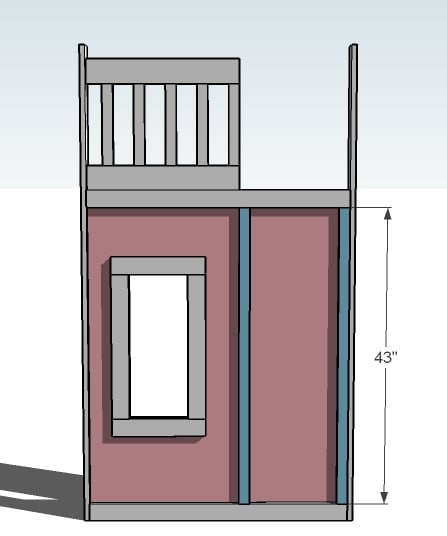
Ladder Spacer
You’ll need this as a spot to secure your ladder too. Use 1 1/4″ screws and glue.
STEP 23
Step 23 Diagram:
Step 23:
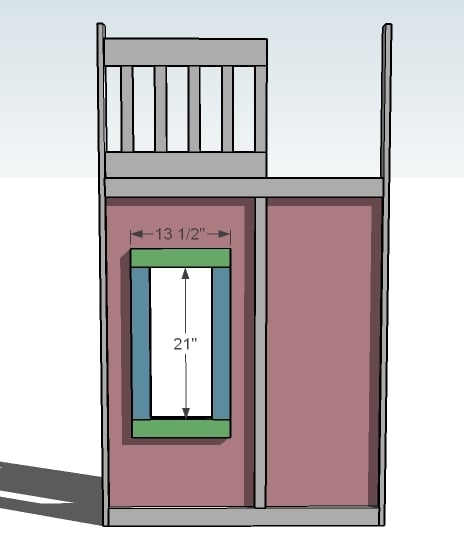
Window Trim
Best bet? Build the window frame separately with a Kreg Jig, and attach the window to the plywood with finish nails and glue. You can also attach each piece separately.
STEP 24
Step 24 Diagram:
Step 24:
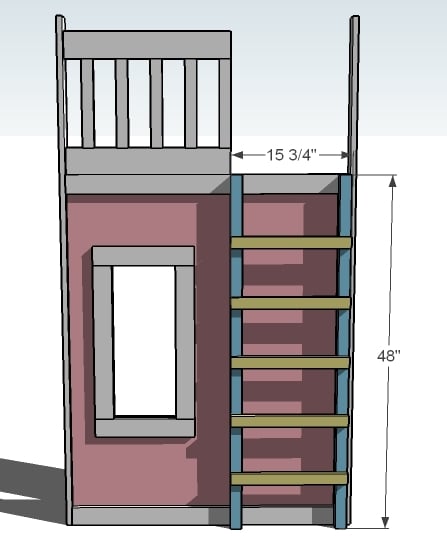
Ladder
Build the ladder with the 2x2s and 1x2s, using 2″ screws and glue. Space the rungs 7″ apart, leaving less room at the top. Screw to the end with 2″ screws and glue.
You have built all four walls! Click on the page links below to see how to assemble the four walls and add the mattress slat
STEP 25
Step 25 Diagram:
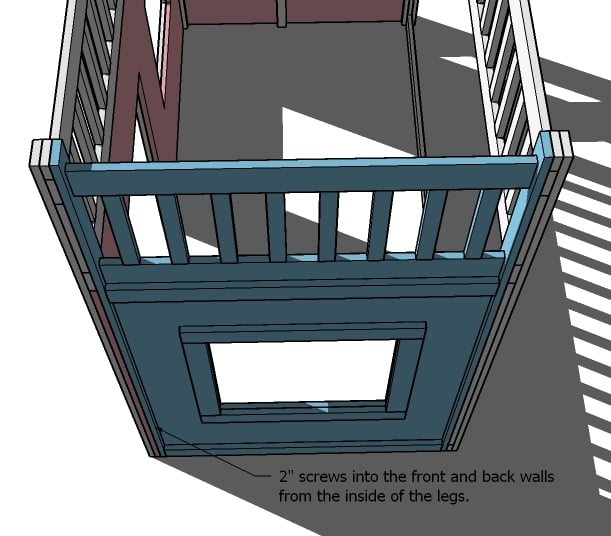
Step 25:
This bed is built in such a manner that you can attach the four walls easily, creating a leg that looks like a solid post. Use 2″ screws from the inside and leave off the glue for easy dis assembly. Adjust the entire playhouse for square.
STEP 26
Step 26 Diagram:
.jpg)
Step 26:
To allow your mattress to “breath” slats are the best way to go. You can purchase metal brackets, or use a 2×2, glued and screwed to the insides of the rails, as shown here.
STEP 27
Step 27 Diagram:
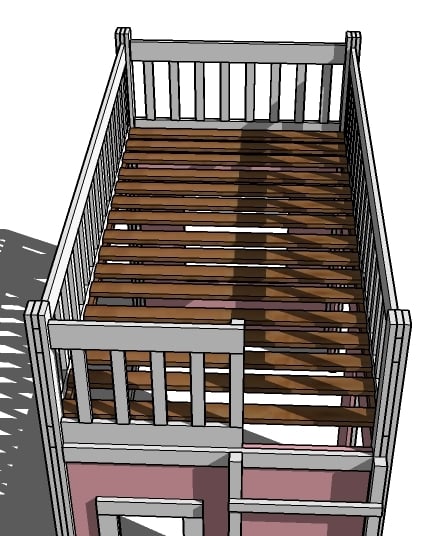
Step27:
Install slats by laying on the cleat and screwing down. Leave the glue off so you can remove the slats. Place the slats according to your mattress recommendations.
FINISHING INSTRUCTIONS
Preparation Instructions:
Aw the fun part . . . good luck!

No comments:
Post a Comment