
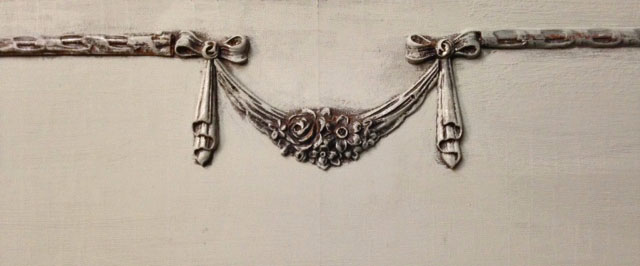
you will notice a strip of the decorative trim is missing…. On most makeovers I would just
leave the missing piece and paint over the area—but this trim is part of the outline
on the drawers and would really distract from the look if not repaired…..
So here we go---step by step process on how to make a trim mold and
then a new trim piece to replace the missing trim. In the past I have used
silicone for this process – but this time I decided to try a different product…
1. First step—I used Das Clay to make the mold…This step is easy…roll out the clay on a
cutting board or another smooth surface..


2. Next I cut the clay into a long strip that would fit over the piece of trim
that I was using as the mold…
that I was using as the mold…

I sprayed WD 40 on the clay prior to pushing it on the trim so it would be easy to remove...
Next I pressed the clay on the trim strip that I was using for the mold and
pushed into the detailed crevasses so it would form the detail… .Then I gently peeled
the clay off the trim piece as to not stretch it out of shape and placed it in the oven
for 5 minutes at 350 degrees. Below is a picture of the clay as soon as
I removed it from the trim.

3. Once hard and dry all the way through—this is your mold. It will continue to harden
so if you leave it over night that would be the best option.... Below are 2 of my molds
after being removed from the oven.
so if you leave it over night that would be the best option.... Below are 2 of my molds
after being removed from the oven.

4. Now to make the actual trim piece....On this step I first tried
KwikWood - an epoxy/wood filler type product…I had trouble removing this from the mold
in one piece so I decided to try the Das Clay again….(I think I may have pressed to hard on the
KwikWood… so that was operator error – not the product….. )
KwikWood - an epoxy/wood filler type product…I had trouble removing this from the mold
in one piece so I decided to try the Das Clay again….(I think I may have pressed to hard on the
KwikWood… so that was operator error – not the product….. )
5. I sprayed the mold with WD 40 and pressed the clay into mold– leaving some clay
over the edge giving me a piece to hold on to when I removed it…. I only left it in the
mold for a few minutes and pulled it out and let it set overnight..I did a few different
pieces so I would have enough for the entire strip and some extra’s .......just in case…
I sanded the edges of the new pieces and glued them to the dresser…since I will be
dry brushing the area I needed the new trim to match the original trim so I stained the
trim and painted it a bit to help match…New trim left--original trim on right......

6. And here is the trim with the first coat of paint.....if you did not know the difference
it would be difficult to tell! Give it a try--any questions send me a message on my
facebook page (there is a link on the left sidebar) and I will be happy to answer
your questions....Good luck!!
No comments:
Post a Comment