RoyalAlbert.com - Click Here!
Showing posts with label vegetables. Show all posts

Tuesday, February 10, 2015

How to Condition and Plant a Straw Bale Garden

Straw Bale Planter
http://bonnieplants.com/library/how-to-condition-and-plant-a-straw-bale/

When it comes to thrifty, versatile ways to garden, it’s hard to beat a straw bale garden. It often costs less than a bag of potting soil, you can put it wherever you want (no soil required), and it’ll eventually turn into compost – so what is your garden this year can feed your garden next year. How’s that for recycling?
Many garden centers, home improvement stores, and feed stores sell straw bales. Once you bring yours home, there are just a few steps you’ll want to take to get it ready for planting. Learn all about them in our handy video or follow the instructions below.
Choose a sunny spot

Once that bale gets wet (details below), it’ll grow much heavier and harder to move, so make sure it’s where you want it to stay. If you pick a grassy area, put several layers of newspaper or a piece of cardboard underneath to keep grass and weeds from growing up into the bale. Or, if you want to give your bale a more polished, upscale look, consider building a simple, handsome frame to hold it. Ours (pictured above) has casters on the bottom for easy movement, making it perfect for a deck or patio. Use these step-by-step directions to build our Straw Bale Frame. (Tip: You’ll want to condition the bale nearby before you put it in the frame, to avoid getting conditioning-related runoff on your deck.)
two straw bales with alternate sides up
For best results, position the bale so that the side showing cut straw ends (left), not the side with folded-over straw (right), is facing up.

Position the bale

Turn the bale narrow side up, so the strings holding the bale together are now on the sides (you don’t want those strings to be on top, just in case you sever one while you’re planting). On one narrow side, the straw will be folded over; on the other, it will be cut. Make sure the cut side is up, as the hollow straws will allow moisture to penetrate better.

Condition the bale

As soon as moisture hits the bale, it will start to decompose, and the inside will heat right up – definitely not a good thing for the plants. The solution? Condition the bale before you plant. This process usually takes around 10 to 14 days. For the first 3 days, simply water the bale thoroughly so it stays damp. For the next 6 days, in addition to watering the bale, use a liquid fertilizer like Bonnie Herb, Vegetable & Flower Plant Food to add nitrogen to speed the decomposition. Simply add a capful to a gallon of water and pour it all on the bale. (Another option is to sprinkle a cup of ammonium sulfate on the top of the bale on days 4 through 6, then a half-cup on days 7 through 9. Each time, water the fertilizer in.)
compost thermometer in straw bale
As the bale goes through the conditioning process, the internal temperature may rise to 120 degrees or even higher.
On day 10, return to simply watering the bale, and continue doing that until the temperature inside the bale starts to reflect the temperature outside. Use a compost or meat thermometer to keep tabs; you’ll see the temperature start to rise after the first day or two, spike about midway through the process, then start to come back down. Once it reaches ambient temperature, the bale is ready to be planted.

Choose your plants

You can grow just about anything in a bale that you can in the ground — with a few exceptions. Tall plants like indeterminatetomatoes and corn, for example, get too tall and heavy, and can start to break the bale apart. (If you wish to grow tomatoes, stick with bush or other determinate varieties.) Running plants like sweet potatoes can be harder to grow in a bale, too. Also, if you live in a very warm, humid part of the country, the bale may begin to decompose more quickly than in other climates, so you’ll want to stick with smaller plants like herbs and flowers, or use it for your cooler weather leafy crops. Whichever plants you choose, space them the same as you would in the ground.
hands planting bell pepper in straw bale
Give these plant a few weeks and you’ll have plenty of bell peppers to harvest!

Plant the bale

Remove straw to form a hole that is as deep as rootball of your plant (though if you’re planting a tomato, of course, you’ll want to go deeper.) Place the plant in the hole, add some quality potting soil around it for extra nutrients and stability, then fill the rest of the hole in with some of the straw you removed. Water well.

Water and fertilize regularly

Your plants will receive less nutrition from the bale than they would from soil, so it’s important to fertilize them every week or two. You’ll also want to make sure not to let the bale dry out.
And you’re done! You can create your garden out of as many straw bales as you want, arranged in whatever shape or style you like. Happy growing!

Wednesday, January 7, 2015

10 Fruits & Vegetables That Dogs Absolutely Love!

Apple

#1 – Apples

An apple a day keeps the veterinarian away? This may be true, apples contain antioxidants that help boost immunity. Plus they’re sweet… dogs love the sweet.
Read more at http://theilovedogssite.com/10-fruits-or-vegetables-that-dogs-absolutely-love/

#2 – Spinach

Spinach
Not only is spinach high in iron, but it is also contains calcium for bone health. Spinach also contains anti-inflammatory/anti-cancer properties by way of flavonoids and carotenoids.

#3 – Pumpkin

Pumpkin
Baked fresh or canned, dogs lick their chops when this tasty treat comes in their direction. Pumpkin is also the go to aid for problematic digestion. It works for constipation AND diarrhea.

#4 – Green Beans

Green-beans
Added fiber and crunchiness, green beans also offer a plethora of vitamin nutrition. They also are a low calorie filler for dogs who like to eat between meals, but are watching their figure.

#5 – Watermelon

Watermelon
Chock full of the antioxidant lycopene, watermelons are mild enough for most dogs to eat. In addition to the nutrient packed goodness, the juiciness is enough to add a little extra hydration on a hot day.

#6 – Cantaloupe

Cantaloupe
These yummy treats are mild, easy to digest for most dogs and pack a vitamin punch. Full of beta carotene, studies have shown that beta carotene may reduce and prevent the growth of cataracts.

#7 – Carrots

carrot
Not only are carrots a filling treat for overweight dogs on a “diet” but they also are good for oral hygiene. Carrots naturally clean and polish teeth. Have a chewer at home? Toss them a carrot to keep them from eating a favorite pair of shoes.

#8 – Blueberries

Blueberries
Given as an occasional rare treat, these little blue balls of antioxidants have been popping up in commercial dog foods in the past few years. Blueberries provide the same health benefits for both dogs and owners.

#9 – Pears

Oregon
This heart healthy treat is high in dietary fiber. Pears are sweet, juicy and most dogs enjoy the taste and texture.

#10 – Sweet Potato

Sweet-Potato
These holiday favorites should been treats all year round. Sweet potatoes contain high amounts of amino acids, which are good for strong lean muscles and enhances antioxidant properties.

Wednesday, November 12, 2014

17 Ways To Make Money While Living Off Grid

norway cabins
Here’s how you can make money while living off grid. This list is designed to give you some ideas and inspire some creative thinking on ways to make a living from home while living off grid. There are many reasons for this, the first and perhaps most important is it frees you up to move just about anywhere you want. No more being tied to a certain location, city, county, state, etc just to be close to your job. The only other issue is schooling for your kids if you have any, and access to food, supplies, and entertainment.
This article assumes you pick an off grid homestead location which is close enough to a populated area to generate revenue through local sales and services you offer to local residents.
The Internet - You can also do a large portion (if not all) of your business on the internet by selling products and services on your website. This is an extremely powerful marketing method and opens up many avenues and income opportunities. As such an entire book can be written about the many different ways to make money online, and in fact they have. Which is why this article will focus on the local sales, with some emphasis on internet sales and online marketing of your tangible products as well as digital products.
Ok, so without further ado, here are 17 things you can do to make money from home while living off the grid.

1) Selling Food Fruit & Veggies – Farming & Gardening

Growing your own organic food, fruits and veggies is perhaps one of the most sensible and lucrative ways to make money off grid. Not only will you be able to feed yourself and your family, but if you grow enough, you can turn it into a small business by selling fresh produce to your neighbors and at your local farmer’s market. If there’s no farmer’s market in your area, you can start one.
Or, you can also do what Curtis Stone does by selling fruits and vegetables to higher-end restaurants in nearby towns and cities. There are certain health regulations that govern this kind of business, but it is doable and worth the extra effort.
Curtis Stone, founder of Green City Acres, grosses $80,000 to $100,000 per year working 3 seasons out of the year, while taking winters off. The most amazing part of this, is that he farms on only about 1/3 of an acre.”

2) Cabin Rental

You can build small cabins on your land and rent them out to vacationers and outdoorsman and nature enthusiasts. Even in the “off-season”in the winter, many resorts, lodges and cabin campgrounds rent out their cabins for $35 to $50 per night. In peak season small one room cabins can rent for as much as $250 per night or more, and I’ve seen some 2-3 room cabins rent for over $500 per night. One good season could provide enough income for you and your family to live on the rest of the year.
As with anything it takes money to build something like a campground, and there’s regulations and ordinances that you have to consider. All in all, it’s a great way to make a good income, even part time if you only open for business part of the year.

3) Hiking & Camping (tourism)

You can cater to the hiking world if you have quite a bit of land. Or if you don’t have lots of land, if you pick a property that borders a National Forest or National Park it opens up all kinds of adventure types of outings that you can sponsor and sell.

4) Hunting & Fishing (tourism)

Outdoorsman and nature enthusiasts number in the millions. If you have a property that’s located near good hunting and fishing areas, or your land is large enough to support hunting and fishing, then it’s can be a nice income during hunting seasons.  Fishing is pretty much years round, but will slow in winter.

5) Educational Workshops – Organic Growing, Primitive Survival Skills, Off Grid Lifestyle, Natural Building, etc.

Workshops are basically miniature “How To” courses where you teach someone a skill in exchange for small (or large) fee. Now this could be very fun and if you’re knowledgeable and know how to teach people, enjoy speaking in front of groups of people, or like the one on one type teaching environment, educational workshops have the potential to make you a good solid supplemental income.

6) Hosting Events – Weddings, Reunions, Parties

If you own a sizable property or land in a picturesque area then hosting events and parties might be another way you could make some extra income.

7) Permaculture Classes

If you’re into permaculture and are very knowledgeable you can host permaculture workshops.

8) Aquaponics

Aquaponics is the growing of fish and veggies together in a closed loop system. The fish provide nutrients to the plants, and the plants act as natural filters for the water. Once you perfect the growing system, you can build and sell more aquaonics systems themselves, or sell the fish and veggies grown in the systems. Either way it’s a good way to make a little extra money.

9) ATV/Snowmobiling (tourism)

Renting ATVs and snowmobiles is pretty lucrative. Though he snowmobiles sit still in the summer, and the ATVs are pretty useless in deep snow. This said, the costs of purchasing multiple ATVs and snowmobiles to rent out might be beyond the scope of what most people can do financially. However if budgeted properly it could provide some income in a couple few years once the initial investment in equipment is recouped through rentals. There’s also liability insurance you must have, and you must be licensed and bond with your county/city. Renting vehicles like this is expensive upfront, but very lucrative in the tourism seasons and can bring in a healthy revenue stream.

10) Horseback Riding

Riding horses is an old pastime that many people love. It’s also a great experience for the kids to ride a horse for the first time. Renting our horseback rides is a good business if you’re into horses. You could also combine it with a nature trail ride and some camping to spice up the adventure.

11) Arts & Crafts

If you’re good at and love arts and crafts why not sell them? many people will buy your products and art at craft shows and art exhibits. You can even sell these items on the internet in your online store on your website.

12) Clothing

Everyone needs clothes so selling clothing to locals and online might be an option for you. Especially if the clothes are made from materials you grow on your own land.

13) Organic Soaps & Cleaning Products

I know many people who have made a good extra income 9and who’ve made a full time job of it) by making their own soaps and cleaning products from natural non-toxic ingredients. Also, soap is something people need to buy a lot of over and over, so the potential for return customers is high.

14) Woodworking & Making Furniture

If you’re handy with wood, you can make decorative and practical items from wood. Furniture is always in need. Small chairs, tables, and rustic rocking chairs are all things that can be made from the materials on your land if you have lots of trees. I’ve seen handcrafted wooden chairs go for hundreds of dollars each, and full dining room sets for a couple few thousand dollars.

15) Blacksmithing (yes this is still an art form)

Yes! Blacksmithing is still a thing. It’s more of an art form nowadays but it does have it’s practical purpose and you can hire out your skills to local ranchers and farmers. If you’re an artist you might consider taking up blacksmithing if you like working with metal and making sculptures. Many metal sculptures bring in hefty price tags.

16) Art – Drawing, Sculpting, Painting, Pottery

Everyone likes a pretty picture or sculpture. These are items you can sell locally and online. Pottery is a big one, as is digital art. Don’t forget about the online aspect of making money. You need not be tied to a local area when there are millions of people online who might buy your work. Just make sure you have a back up plan, because the phrase “starving artist” is cliche for a reason. It;s a tough field to break into, but it can generate some good revenue if you have talent.

17) Write & Sell Digital Books

This is by far one of the best ways to bring in some extra (and possible full time) income. Seriously, if you are knowledgeable in an area of expertise, and you can put words to paper (or laptop computer) you can write a book about your career field or hobby. Marketing your book online is easy through places like Amazon Kindle, iTunes, and other online digital distribution companies. Selling a digital book is very lucrative because if you content is good, and you write well, then once you cover the initial cost of producing the book and publishing it on some distribution sites like Amazon, then each copy you sell is nearly pure profit. A digital book that costs you $1000 to produce can be sold to an unlimited number of people. Say you sell only 1000 copies at $9.99, that’s $9,990.00 in revenue. Subtract your initial investment of $1000, and that’s $8990.00 in gross profits. Not to bad for a couple months worth of work.
Making Your Own Way
Keep in mind you will have to check with and comply with local, state, and federal laws governing running your own business from home whatever you choose to do. But, owning your own business, doing your own thing, being independent and self sufficient. The freedom to make your own way is a great feeling. I know because I do it everyday.
It’s hard work an will take a lot of effort on your part to make it a success. Strong will power and the right motivation, your freedom and self sufficient independence is the reward. Making a living doing what you love and loving what you do every day will make you and your family much happier in the long run.
And that’s what it’s all about.

Monday, September 22, 2014

The Many Benefits of Hugelkultur

Hugelkultur.png


Hugelkultur are no-dig raised beds with a difference. They hold moisture, build fertility, maximize surface volume and are great spaces for growing fruit, vegetables and herbs.

Hugelkultur, pronounced Hoo-gul-culture, means hill culture or hill mound.
Instead of putting branches, leaves and grass clippings in bags by the curbside for the bin men... build a hugel bed. Simply mound logs, branches, leaves, grass clippings, straw, cardboard, petroleum-free newspaper, manure, compost or whatever other biomass you have available, top with soil and plant your veggies.
The advantages of a hugel bed are many, including:
The gradual decay of wood is a consistent source of long-term nutrients for the plants. A large bed might give out a constant supply of nutrients for 20 years (or even longer if you use only hardwoods). The composting wood also generates heat which should extend the growing season.
Soil aeration increases as those branches and logs break down... meaning the bed will be no till, long term.
The logs and branches act like a sponge. Rainwater is stored and then released during drier times. Actually you may never need to water your hugel bed again after the first year (except during long term droughts).
Sequester carbon into the soil.
On a sod lawn Sepp Holzer (hugelkultur expert) recommends cutting out the sod, digging a one foot deep trench and filling the trench with logs and branches. Then cover the logs with the upside down turf. On top of the turf add grass clippings, seaweed, compost, aged manure, straw, green leaves, mulch, etc... 
Hugel bed in Ontario, Canada (By Travis Philip)Hugel bed in Ontario, Canada (By Travis Philip)
Hugelkulter from permies.com: Pallets used around peripheryHugelkulter from permies.com: Pallets used around periphery
Steeped raised beds: From 'Sepp Holzer's Permaculture'Steeped raised beds: From 'Sepp Holzer's Permaculture'
Sepp Holzer recommends steep hugel beds to avoid compaction from increased pressure over time. Steep beds mean more surface area in your garden for plants and the height makes easy harvesting. The greater the mass, the greater the water-retention benefits.
Vertical logsVertical logs
Hugel bed dug in clay with logs put in vertically, next branches and lots of wood chips. Top 6" will be wood chips and dirt. This bed will store water and give nutrients for many years to come.
Straw bale gardens require less soil, less water and hold heat. As the straw breaks down nutrients feed the plants. Combining a straw surround with a hugel interior, topped by lasagne layering is an excellent idea for an area with poor quality soil.
Hugel bed in Ontario, Canada (June 28) by Tim Burrows. Tim surrounded his very tall hugel bed in pallets!
Sheet mulching (lasagne gardening) is like composting in place. Above: just a suggestion as to sheet mulching layers. Nitrogen-rich material such as fresh grass clippings or green leaves put right on the hugelkultur wood would help jump start the composting process. Could also include seaweed, straw, dead leaves, leaf mould, etc...

The first year of break down means the wood (and fungi) steal a lot of the nitrogen out of the surrounding environment, so adding nitrogen during the first year or planting crops that add nitrogen to the soil (like legumes) or planting species with minimal nitrogen requirements is necessary, unless there is plenty of organic material on top of the wood. After the wood absorbs nitrogen to its fill, the wood will start to break down and start to give nitrogen back in the process. In the end you will be left with a beautiful bed of nutrient rich soil.
Tree types that work well in hugelkultur:

Hardwoods break down slowly and therefore your hugel bed will last longer, hold water for more years and add nutrients for more years. But softwoods are acceptable as well, a softwood bed will just disintegrate quicker. Mixing woods with softwoods and branches on top, to give off nutrients first, and hardwoods on bottom, sounds like a plan if you have access to multiple types of wood. Yet the newly decomposing softwoods at top will eat up a lot of nitrogen at first, so compensate for that.

Woods that work best:
Alders, apple, aspen, birch, cottonwood, maple, oak, poplar, willow (make sure it is dead or it will sprout).

Trees types that work okay:
Black cherry (use only rotted), camphor wood (well aged), cedar/juniper/yew (anti-microbial/anti-fungal, so use only at very bottom or unless already well aged. Cedar should be broken down before new plant roots reach it), eucalyptus (slightly anti-microbial), osage orange (exceptionally resistant to decay), Pacific yew (exceptionally resistant to decay), pine/fir/spruce (tannins and sap), red mulberry (exceptionally resistant to decay).

Tree types to avoid:
Black locust (will not decompose), black walnut (juglone toxin), old growth redwood (heartwood will not decompose and redwood compost can prevent seed germination).
This article was cross-posted from www.inspirationgreen.com/hugelkultur.html

Further resources

Want to learn more about huglekultur beds? We highly recommend Sepp Holzer's Permaculturea ground breaking book that will teach you all you need to know! (Also available as an eBook) (For US readers, you can buy from Chelsea Green HERE)
Desert or Paradise by Sepp Holzer (For US readers, you can buy from Chelsea Green here)
How to make hugelkultur raised beds in Permaculture 68 as a pdf
Exclusive content and FREE digital access to over 20 years of back issues
Trial your FREE digital copy HERE!

Help spread the permaculture word...

Monday, August 11, 2014

How to Make a Recycled Pallet Vertical Garden

Yesterday in between snow flurries, sun, hail, snow, and more sun, I was able to use a few left over strawberry plants to create a wood pallet garden.  I first spotted this great idea at the Seattle Flower & Garden Show in February.
I asked the Handsome Husband if he could find me a couple of good clean pallets asap and he did.  He was able to bring home 2 pallets in great condition the very next day.

Here is how I made my wood pallet garden:
pallet 2

I started by wrapping the back and sides of the pallet with a double layer on landscape fabric.  Landscape fabric can be found this time of year at Costco or pretty much any home and garden store.  After cutting the landscape fabric, I then used an industrial stapler and stapled the fabric to the back and sides of the pallet {use a lot of staples}.
Here is what the back of the pallet looked like before I injected a ton of staples into the fabric.
potting soil
Next, I set the pallet fabric side down, and filled the openings with potting soil.
You’ll want to make sure you push the soil underneath the slats.
If you don’t, when it comes time to stand your pallet up, the soil will slide, and your plants will end up behind the slats.
Next add your plants.  I filled this one with strawberries, but I plan on filling my next pallet garden with an assortment of herbs.
pallet
Here is a picture of the pallet garden up close.  This strawberry garden is still in the ugly duckling stage, but in a few short months the strawberry plants will fill out and cover the exposed dirt.mavis
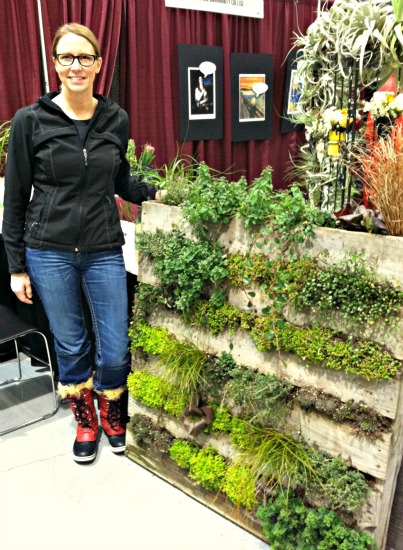
Here is a picture of me with the inspiration for this project.
 I left my pallet on the ground for the time being.  I was afraid to stand it up at this point. I want the plants to have time to wrap their roots around the soil so the strawberry plants will be anchored in place.  In about a month when I stand the pallet upright, I will plant 6 more strawberry plants in the opening at the top of the pallet. 

Monday, March 24, 2014

TIPS FOR A RAISED-BED VEGETABLE GARDEN


Raised-bed gardening is a great way to grow vegetables -- especially if the garden soil is poor or compacted or has poor drainage. And there's no bending over to pull weeds or harvest vegetables.
Raised beds take very little space, and can be built right over a concrete patio. Drainage in a raised bed is superior to that in an in-ground garden bed. A 12"-deep bed provides ample room for most vegetable roots.
The soil in raised beds warms up more quickly in spring so planting can be done earlier. And if the bed is narrow, 3' or less, there will be no need to step on the soil and thus it prevents compaction. It's much easier for roots to grow in loose soil.
Don't build a raised bed on a wooden deck: when the bed is full of soil and water, its weight could cause structural damage.
If the raised bed sits directly on the soil, line the planting bed with hardware cloth or chicken wire at building time to prevent visits from burrowing animals such as gophers and moles.
The bed may be made of wood, stone, brick, cinder blocks or any other material from which you can build a base at least 12" deep. Choose a location that gets at least six hours of direct sunlight each day. Almost any type of vegetables can be grown in raised beds. Exceptions are potatoes, whose roots need a lot of room, and corn, which would grow so high that harvesting would be difficult.
Here's how to plant a raised bed:
1. Fill the bed with good-quality potting soil or compost, and rake the surface smooth and level. Remove any rocks or debris.

2. Plants in raised beds may be spaced a little closer together because fertilizer and manure can be concentrated in the small gardening area.
3. Plant lettuce by poking holes in the soil with your finger at 6" intervals, and sprinkle a few seeds into each hole. Once the seeds germinate, thin to one seedling per hole.
4. You can also broadcast seeds over the surface of the raised bed. If you plant carrots, apply fine-textured potting soil over the top of the seeds. Carrots will attract some species of butterflies to your raised beds.
5. Cucumbers may be planted along the edge of the raised bed, where they can trail over the side. Cucumbers will grow right on top of your patio.
6. Water the garden well immediately after planting.

Raised Garden Beds: How to Build


Raised garden beds are fairly easy to construct and even easier to maintain. Here is advice on how to build raised garden beds for your backyard.

Benefits of a Raised Garden

  • Ideal for smaller spaces (versus a conventional row garden)
  • Great for rocky, poor, or abused soil
  • Produces a higher yield for the area, thanks to better drainage and deep rooting
  • Allows for a longer growing season, since you can work the soil more quickly in the spring in frost-hardened regions
  • Makes gardening easier; for example, intensive planting creates shade mulch to keep the weeds down

Raised Beds Video

Here is a fantastic video on How to Use Raised Beds in Your Garden. Click picture below to watch video.
After you finish watching it, click here to try out the online Almanac Garden Planner which has a special raised bed feature.

Construction Tips

Materials

  • Many people are concerned about the safely of their wood frame. First, rest assured that CCA pressure-treated wood is banned as it was leaching Arsenic.
  • To ensure that the wood lasts, there are several options:
    1) Regular pressure-treated lumber sold today has a mixture of chemicals applied to prevent the moist soil and weather from rotting it. Although pressure-treated wood is certified as safe for organic growing, some people have reservations about using it and there are various eco-friendly alternatives.
    2) More expensive woods such as cedar contain natural oils which prevent rotting and make them much more durable. They are more expensive to buy but they will last many more years.
    3) Choosing thicker boards can make the wood last longer. For example two-inch thick locally-sourced larch should last ten years, even without treatment.
  • You could also use concrete blocks or bricks. Remember that concrete will increase the pH in soil over time.
  • Some people use railroad ties, however, we would advise against this. Though the very old ones may be fine, newer ties use creosote-treated timber which is toxic.

Planning and Design

  • Consider a location that's level and has the right amount of sunlight.
  • In terms of bed size, 4 feet is a common width. Lumber is often cut in 4-feet increments, and you also want to be able to access the garden without stepping into the bed.
  • Length isn't as important. Plots are often 4 feet wide by 8 feet long or 4 feet wide by 12 feet long.
  • The depth of the bed can vary. Six inches is a minimum. Plants need at least a 6- to 12-inch rooting zone, so 12 inches is ideal.
  • Before you establish the bed, break up and loosen the soil with a garden fork so that it's not compacted. Go about 6 to 8 inches deep. For improved rooting, some gardeners like to remove the top layer (about a spade's depth), dig down another layer, and then return the top layer and mix the soil layers together.

Building the Bed

We'll speak to timber-built beds in this article since lumber is the most common material used.
  • To support timber beds, place wooden stakes at ever corner (and every few feet for long beds). Place on the inside of the bed so that the stakes are less visible.
  • Drive the stakes about 60% (2 feet) into the ground and leave the rest of the stakes exposed above ground.
  • Ensure that the stakes are level so that they're in the ground at the same height, or you'll have uneven beds.
  • Set the lowest boards a couple inches below ground level. Check that they are level.
  • Use galvanized nails (or screws) to fix the boards to the stakes.
  • Then add any additional rows of boards, fixing them to the stakes, too.

Soil for Raised Beds

  • Fill the beds with a mix of topsoil, compost, and other organic material, such as manure, to give your plants a nutrient-rich environment.
  • Note that the soil in a raised bed will dry out more quickly. During the spring and fall, this is fine, but during the summer, add straw, mulch, or hay on top of the soil.
  • Frequent watering will be critical with raised beds, especially in the early stages of plant growth. Otherwise, raised beds need little maintenance.

Plants for Raised Beds

Almost any crop can be grown in a raised bed. Vegetables are most common, but fruits and even shrubs and trees can be planted, too. Remember that some plants will hang over the edge, so try to think about where you are planting what.
Here's one of many plot plans to consider, courtesy of the Alabama Cooperative Extension System.

Wide Width Damask Jacquard Curtain  - Besthomefashion.com

View more gifts at Zazzle.

Blog Archive